

Accurate.Video Validate is powerful yet tremendously simple to use. The backbone of the application, the dynamic timeline, is optimized for advanced functionality combined with a UI that is easy to comprehend. This guide will go through the content of AV Validate.
Note that all features and functions described in this guide may not be included in the version you are currently using.
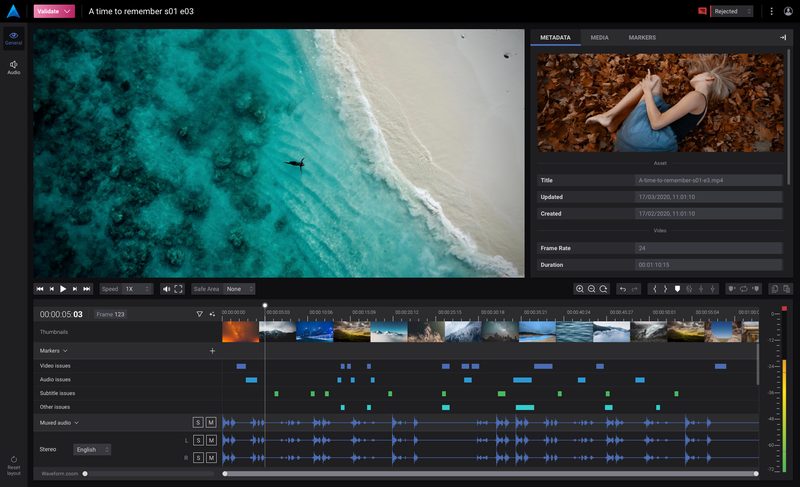
The Accurate.Video timeline represents all the activated content of the asset with frame accuracy. With the ability to zoom in on the timeline you can actually see each individual frame.
The timeline also gives you a perfect overview of all activated audio and subtitle tracks as well as the time based markers that highlight and distinguish portions of the video.
The timeline is separated into rows of tracks to distinguish different content, and for markers you can create your own unique tracks. You can search the video by clicking on the timestamps or by dragging the current time indicator. The timeline also includes miniature thumbnails of the video to give the user an overview of the content.
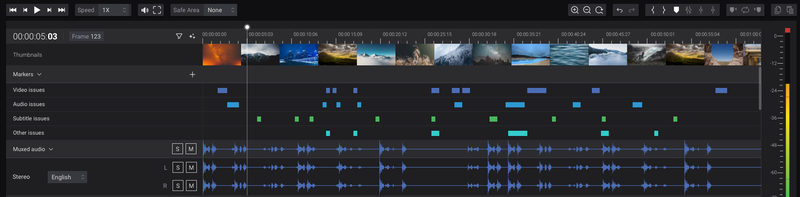
By clicking on the thumbnails under the timestamps you can search the video as shown in the image below:
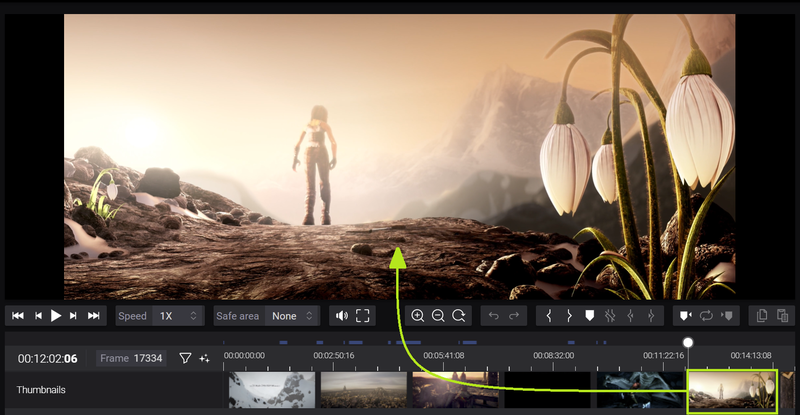
Frame specific thumbnails can also be seen by hovering the timestamp with the cursor to quickly find a specific part of the video:
Furthermore, a big part of the user-friendly UI is the ability to click and highlight all cues. E.g. click on a subtitle or marker cue and you will find yourself positioned on the same frame where the cue starts, hover over it with your cursor and you will get information about the cue.
Your accurate playback position is always represented by the current time indicator (CTI). Play the video and you will see it flow through the timeline, stop the video and it stops immediately. The current time indicator cuts through the entire timeline to make it clear where the marker cues and the audio waveforms are positioned
This powerful tool lets you scrub the video to anywhere at any time, regardless if you are clicking on a specific timecode or if you drag and release the indicator. Timecode inputs, clicking a subtitle/marker cue or using the framestep functions also update the position of the current time indicator instantly.
The CTI also visualizes the buffering of the video in a subtle yet distinct way.
With Accurate.Video you have full control over your video on a level of frame detail. Apart from play and pause you also have the ability to framestep one or ten frames back and forth.
Added to this is the ability to change playback speed from the range of 64X speed to negative 16X speed presented by a convenient dropdown menu. All the settings are dynamic and can be changed during playback.
The playback panel also includes a dropdown for activating safe areas (see information about safe areas further down in the guide), a parent volume control and a button to show the video in fullscreen.
The loop function is very convenient if you want to review a specific portion of your video. With AV Validate you can create your own loop in the easiest way possible by creating an inpoint where the loop should start and an outpoint where the loop should end. After the points are set you activate the loop function with the “Loop” button or hotkey “R”.
The playback loops you create are dynamic and can be changed at any time by dragging the in and outpoints, even when the video is playing. Click on the loop button or hotkey again (or remove the points) to get out of the loop.
To be able to reach all the functions with ease and to sort out what is relevant for you, Validate is divided into different sections. Each section is represented by a tab, and by clicking one of the tabs you will immediately reach the preferred area of the application. These are the tabs that are represented in the AV Validate general workspace:
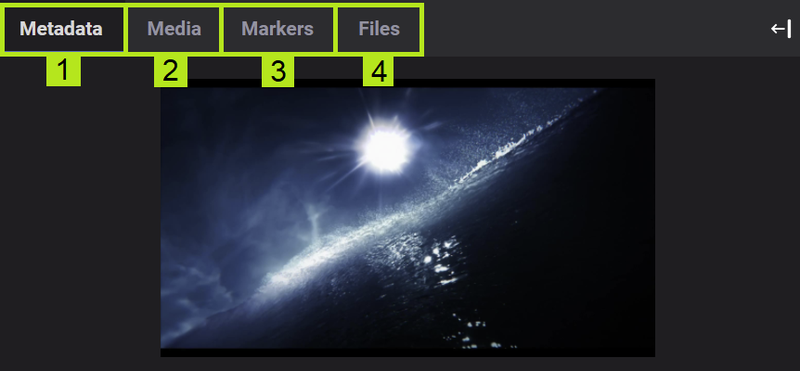
The metadata tab contains all you need to know about the asset. Here you find all the relevant information about your assets such as creation date, frame rate, duration, video files info, audio files info, subtitles info etc. You also have the possibility to edit how the metadata is presented, see the Metadata Fields section.
There's a specific user guide for how to edit metadata that can be found here.
The media tab handles all your preferences and lets you activate the ingested files of your choice. Here you can do the following:
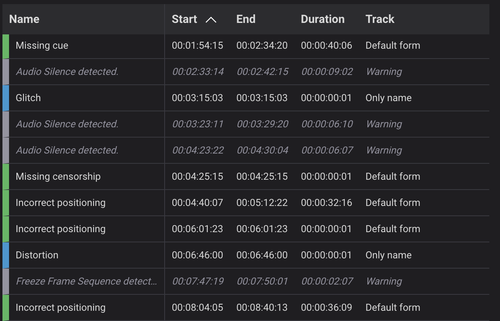
With the ability to create and edit markers, you can highlight and distinguish portions of your video. Here you have a list of all your markers and also the following options:
There are a few things that a user can configure to adapt the marker table to suit their personal workflow. These settings can be found in the header of the marker table.
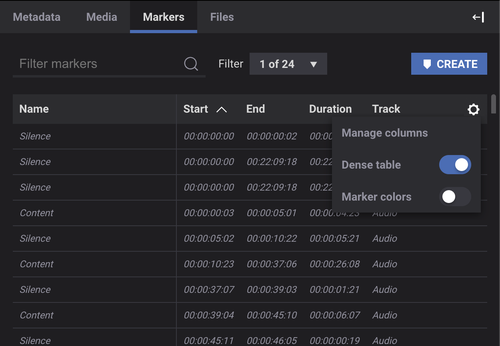
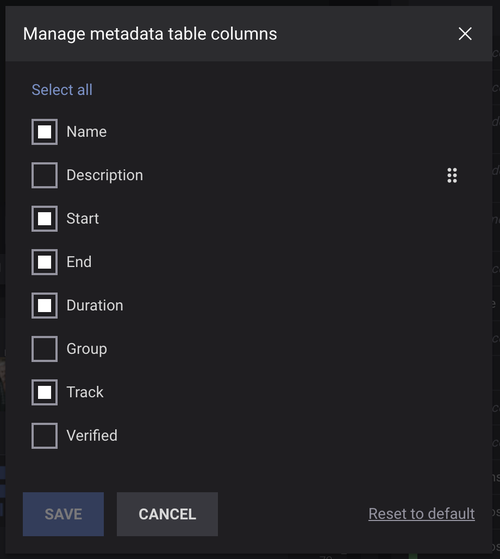
This allows the user to select and re-arrange the columns that are displayed in the marker table. Using the modal seen in the screenshot below. The content of this modal is decided by the setting markerTableDefinitions.
This setting decides whether text in all table cells should be displayed in full or truncated. Is useful in scenarios when working with fewer markers containing a lot of information.
This setting determines whether to display the color of the marker track next to the marker in the table.
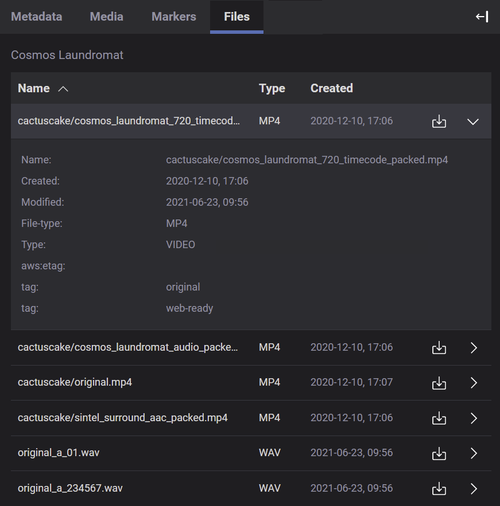
The files tab can be activated easily through settings, and under the files tab you can see information regarding each file that has been ingested to the asset. Depending on different file types you will see adequate important information. Here you can also download each individual file.
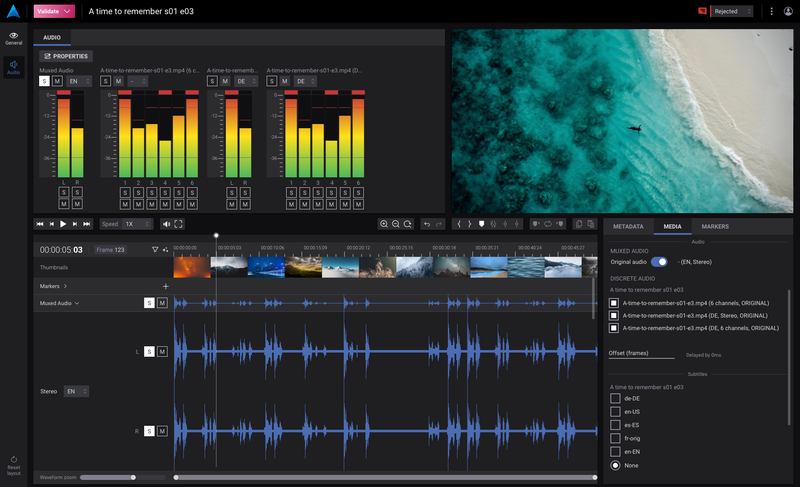
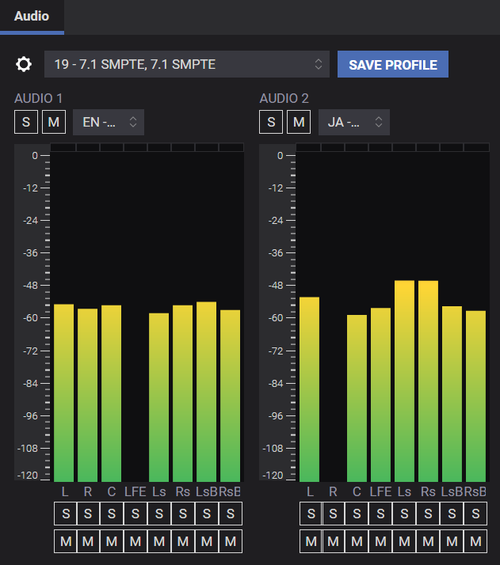
The audio workspace visualizes the audio of your asset and presents audio meters for all your activated audio channels.
All panels are adjusted per default to focus more on the audio aspects of the asset, but you can adjust the panels manually to find the perfect solution for your personal workflow.
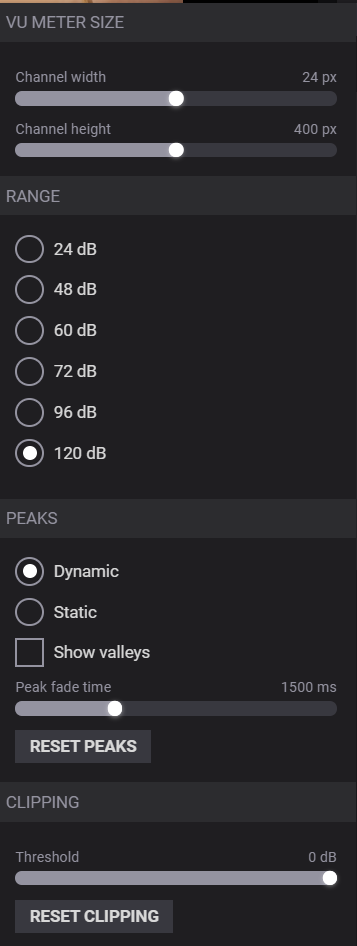
Advanced options to edit and manage the audio meters can be found under “Properties”. You can change the width/ height and the range of the VU meters, and also how the peaks and valleys should behave based on the volume of different audio files.
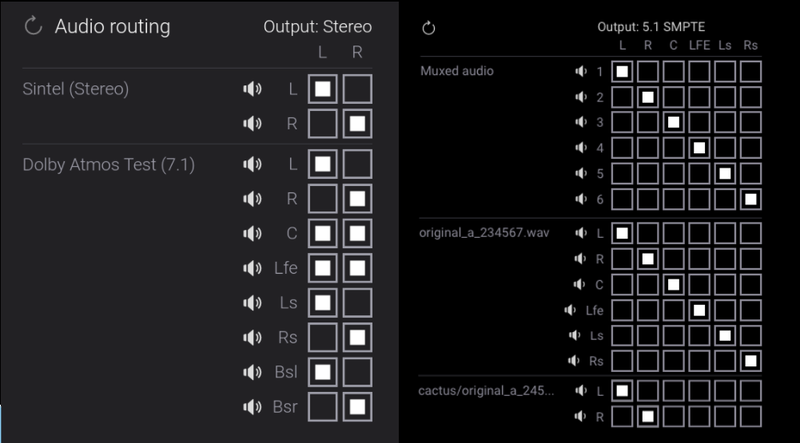
Audio routing is a UI component included in the audio workspace that can route one audio component to another. With this component you can easily route all the audio from one language to the left output channel and another audio language to the right output channel to verify that they are in sync and much more. In the image below you can see examples of different output channels:
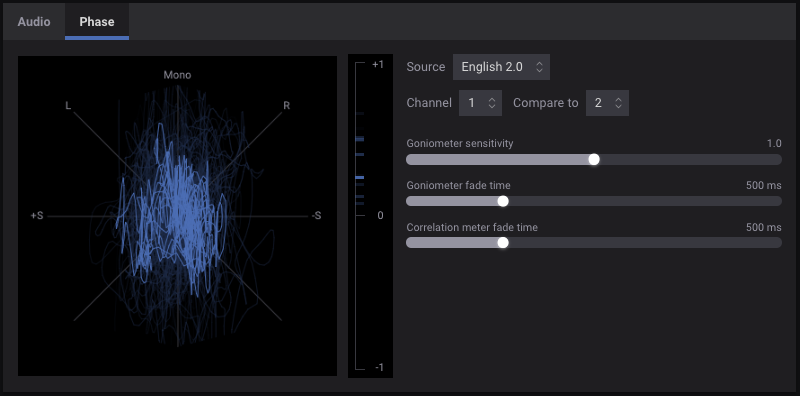
The phase tab, and its containing UI elements, allows the user to inspect the phase differences between two channels of audio in real time. It's possible to choose which two channels you want to compare as well as adjusting the display logic and timings.
The Virtual Tracks feature lets you create audio tracks that span file boundaries. Normally an audio track is mapped to a single audio file, but when using Virtual Tracks the one-to-one mapping is replaced with a one-to-many mapping:
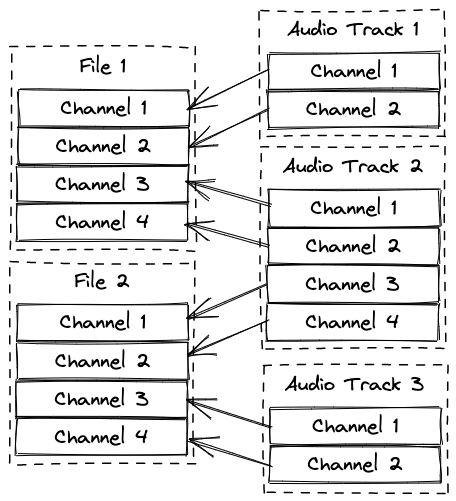
Virtual Tracks allows audio tracks to contain channels from one or more audio files. This is useful since the browsers (at the time of writing) have a limitation that only allows a single (1) stream of audio with a maximum of 8 channels.
Using Virtual Tracks makes it possible to ingest multi-channel audio files that in reality include several audio tracks and use Validate to determine the audio track boundaries within the multi-channel file.
To help determine the audio track boundaries you can configure audio profiles which you can use in Validate to classify the content. In turn, the profile can be used to trigger a transcode job to extract the audio tracks from the multi-channel file. Read more about how to configure Virtual Tracks in our technical documentation.
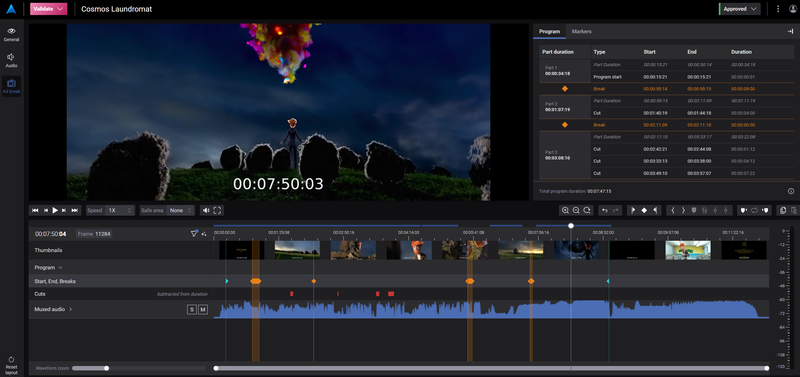
The ad break workspace supports workspace specific timeline tracks where ad break markers can be created.
With this particular workspace you can easily define the start and end of a program, create breaks and distinguish parts of your video to prepare for commercial breaks etc.
The ad break markers also have a highlighted in and out point that cuts through the whole timeline to really clarify the exact position of the breaks.
The duration of the break markers is calculated differently from other markers in AV Validate. The reason for this is because the start frame is the last frame of the previous part, and the End frame is the first frame of the next part. Everything in between will be subtracted from the total duration. The duration that is displayed in the tables are the frames that will be removed and not the length of the entire marker.
The ad break workspace also adds three buttons to the toolbar:

If using the start/end button and start/end is already created, the toolbar buttons will move the start/end marker to the current timecode.
In the ad breaks workspace you can also create unique “cut” markers to mark out sections of the video to remove, e.g. for compliance reasons. These markers are distinguished from other markers with a red color. The duration of the cut markers are also subtracted from the program part it lies within, and thus affect the total duration of the video in the program table.
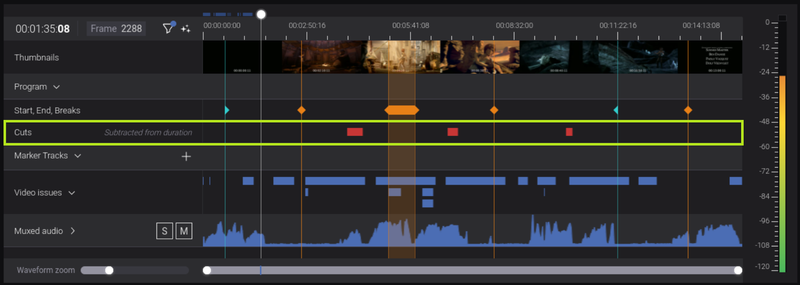
All cut markers are gathered under the marker tab, and are also displayed in the program tab.
Read more about “regular” markers further down in this guide.
In the program tab you have a program table that lines up all the different parts of your video. For each ad break that you create, a new part is created in the program table. I.e if you create an ad-break in the middle of the video, then the program table will split into one part before the ad-break and one part after. This gives you a sublime overview of your content with regards to the amount of breaks and duration between each break as well as the total program duration.
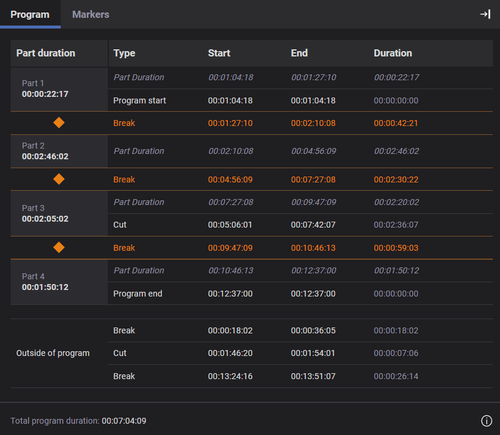
Any ad break markers located outside of the defined start and end of the program, inside a break with duration, or overlapping breaks, will be located in a separate section in the table called “Outside of program”. Markers in this section will not contribute to the calculation of program/part durations.
Clicking on a part will display that part in the timeline, making it easy to navigate to the beginning and end of a part, i.e. first frame after a break and last frame before a break. All of the Start and End timecodes in the table are also seekable.
In the bottom of the program tab the total duration for the program is displayed, which is the calculated duration of the whole program from start to end where breaks and cuts are subtracted from the duration.
See the Ad break configuration guide to learn more about how to configure the ad break workspace.
In Accurate.Video Validate you have everything you need to differentiate parts of your video with markers and marker tracks. All your created markers are editable and have a wide range of customizability. You can create markers easily with the help of the current time indicator combined with the inpoint and outpoint buttons.
The inpoint of a marker is the start frame of the specific marker cue, and the outpoint is the last frame of the cue. To create a marker cue you begin by positioning the current time indicator where you want the inpoint to be, and then click on the “Set Inpoint” button. Do the same with the outpoint using the “Set Outpoint” button and you get yourself the start and end of a marker.
With the inpoint and outpoints set you can instantly jump to their position by using the “Go to inpoint/outpoint” buttons. There are multiple other buttons and functions connected to markers, and all buttons have hotkeys to create a faster workflow. Below is a description of all the buttons and hotkeys regarding markers:

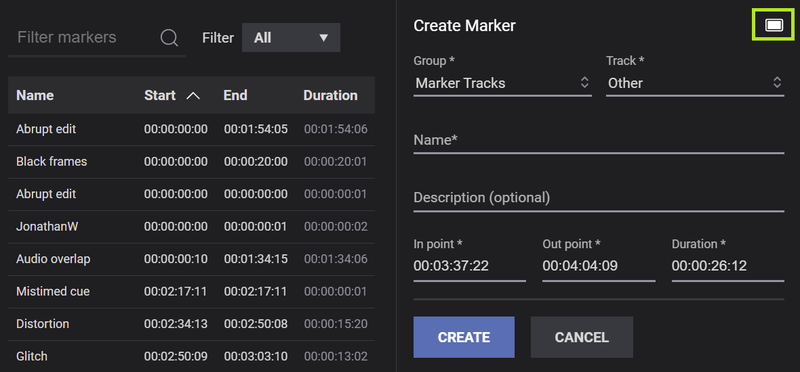
When you click on the “Create marker” button (or hotkey “M”) you are taken to the create marker form. Here you can select which marker group and marker track the marker should be created in (based on your settings).
All the marker tracks are distinguished in separate rows on the timeline, making this a perfect way to sort marker cues in different categories. If you highlight a certain marker track prior to creating a marker the marker will by default be created there, but if you have not selected a certain marker track the default track will be “Video Issues”. You can of course change this from the create marker form with the “Track” dropdown.
On predefined marker tracks such as shown on the image below (Video issues) you have a dropdown to select a proper name, but with custom marker tracks you can name your markers with free text (read more about how to create custom marker tracks further down this guide). You can also add a description for each created marker.
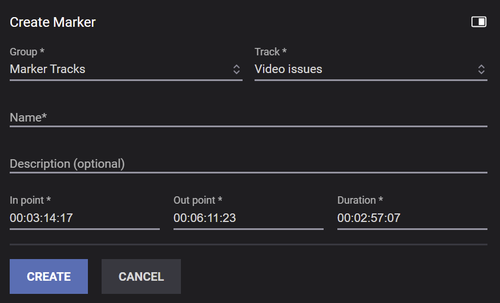
Apart from naming the marker cue and adding a description, you also have the ability to change the inpoint and outpoint from this screen. This is the perfect opportunity to make minor adjustments. You can always see the total duration of the marker cue, and it will change in real time if you adjust the inpoint/outpoints.
When everything is set, just click the create button and watch as the marker cue appears in the marker track you selected on the timeline instantly.
If you want to see a list of all your created markers simultaneously as you create a new marker you can click on the “Show split view” at the top right corner of the marker tab. You can toggle back to full view by clicking the same button again, see image below:
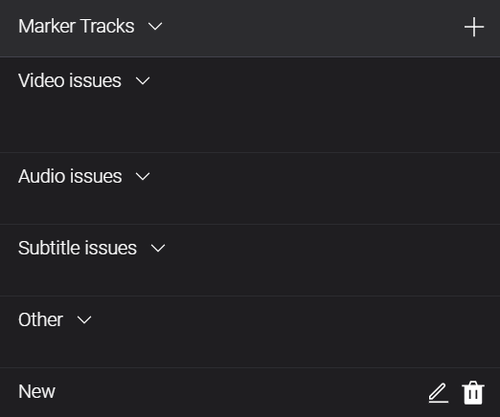
The global marker tracks are predefined and created in global marker track settings. With Validate you also have the ability to create your own unique custom marker tracks.
Simply click on the “+” next to Marker Tracks to create a new track, and proceed by giving the track a name. You can edit the name of your custom track at any time by clicking on the “pen” icon next to the track that will appear when you hover over it. All custom marker tracks can be deleted by clicking the “trashcan” icon. This will also remove all markers situated in that particular track.
Instead of creating the same custom marker multiple times on different marker tracks you can use the copy and paste function. Highlight the marker you want to copy and click on the “Copy marker” button (hotkey “Ctrl+C”), then click on the marker track you want the marker pasted to and click on the “Paste marker” button (hotkey “Ctrl + V”).
You can paste the same copied marker to multiple tracks, and they will always appear on the timeline with the exact same timecode and duration.
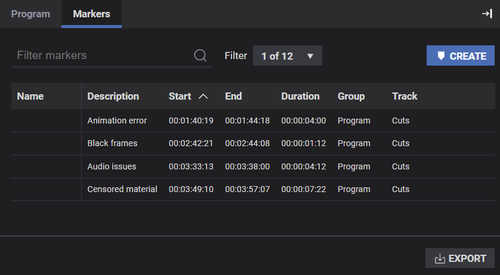
All the markers you have created can be downloaded to your local storage. Under the Markers tab you will find a button to export all your markers for the asset you are working on. You can also select to only export certain markers based on tracks. When you export markers you can select if you want them in CSV, XML or JSON format.
The Accurate.Video Validate delivers additional important functions as well. With the dynamic timeline the application is a perfect tool to compare discrete audio tracks and different subtitles. Apart from this Validate also includes functions to set a specific start time to an asset, as well as setting a global offset for all your audio files in an instant.
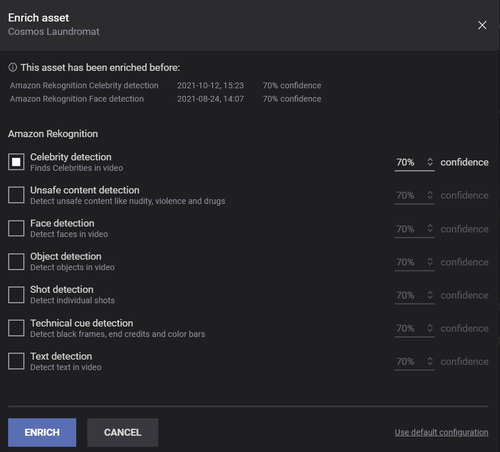
AWS Rekognition is a powerful analysing tool that can save you a lot of work by automatically detecting certain elements of your video and presenting them as markers on the timeline. With AV Validate you can use rekognition services on already ingested assets through the "Enrich" icon, found to the left of the timestamps on the timeline. Read more about enriching assets in our AWS Rekognition guide.
With AV Validate you can customize the different panels of the application to better suit your personal workflow. Drag the timeline panel up and down to find your own preferred view. The “Tab” panel can also be adjusted to a wider state to make certain elements more visible. The latter can even be docked all the way down on the right side by clicking the “Dock to side” button positioned at the top right corner of the tab panel.
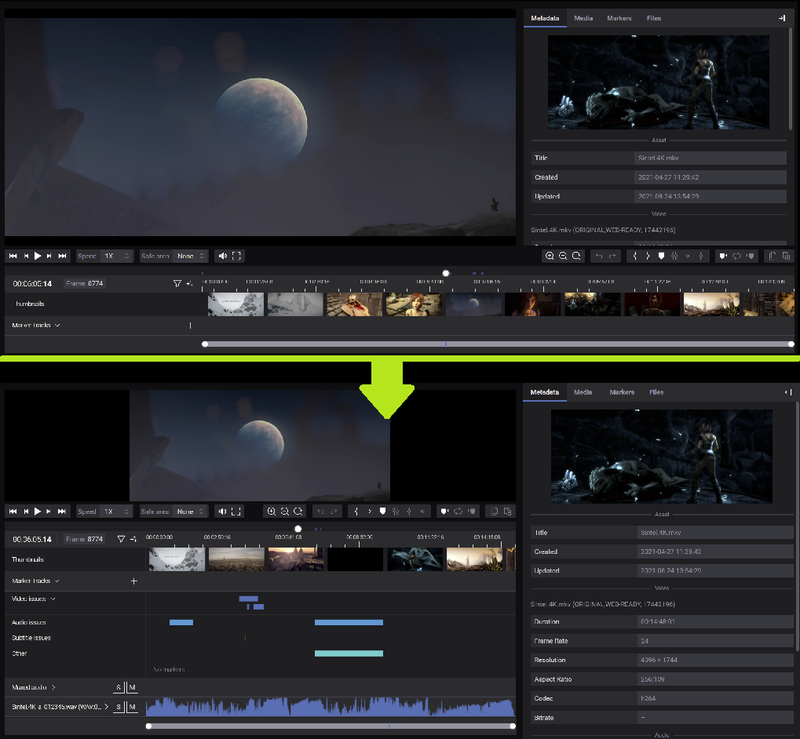
Notice the difference between more focus on the video panel with an undocked tab panel compared to a higher timeline panel and a docked tab panel
With the ability to activate all your discrete audio and subtitle files, you can see them lined up and compare them with precision. All the files associated with the asset are just one click away to be activated on the timeline. If you do not want to see a particular audio track or subtitle, just deactivate it. Simple as that!
The global offset function is a great way to adjust all your audio at the same time. You have probably noticed a video in the past where the audio is a tad off sync. With global offset you can adjust this in seconds. The global offset can be found under the Media tab, and consists of an input field so you can edit the global offset with a precision of milliseconds.

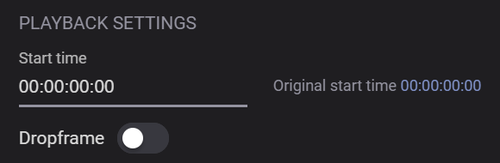
AV Validate provides full control over your video. In addition to all the standard playback settings the application also includes advanced playback settings that you will find under proxies in the Media tab. Here you can customize the start time of your video, and also toggle dropframe on, which is a lifesaver for videos with a certain framerate. Of course you can reset everything to its original state if you change your mind.
AV Validate also includes the ability to search a specific frame based on the timecode. Simply click on the input field, insert your preferred timecode (or a specific frame) and press enter. The video immediately jumps to the new position.You can also activate the frame counter under “Preferences” that counts all the frames in the video in addition to the normal timecode.

In addition to multiple audio and subtitles, you can also ingest multiple proxies to your asset. This is a good way to compare video quality between proxies. It works similar to discrete audio files and subtitles, as you can change proxies with the click of a button.
With Validate you can open multiple assets at the same time. Simply add a comma (“,”) in the URL followed by the ID of the subsequent assets you want to open. In this way you can add multiple assets to open at the same time (,44,23,22 for example).
Furthermore you can add additional content from other assets with the URL by writing “&components=” at the end of the URL followed by the ID of the component you want to open. This is a brilliant method to see if certain elements are suitable for the asset you are working with.
If you want to open your asset with one of our other applications (based on your subscription), we have added a convenient dropdown that lets you change applications instantly.
Under the user icon in the top right corner you will find the preferences menu. For AV Validate you can select if you want a frame counter activated or not with a toggle on/off. The frame counter feature can be very useful to gain constant control over exactly what frame you are positioned in when working with an asset.
Under preferences you can also change what application you want to open your assets with when you simply click on them. The default preferred application is Validate, but you can change this to any AV application of your choice. Preferences also include additional options for our other applications.
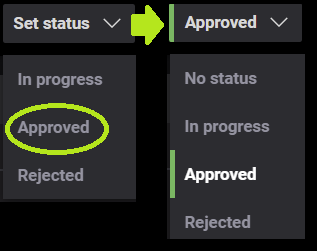
With Validate you can also review and set the status of an asset. In the top menu there is a dropdown that gives you the option to either set the status of “In progress”, “Approved”, or “Rejected”.
All different statuses have their own unique color that will be visible both in the dropdown within the particular asset, and also in the asset page where all of your assets are gathered. Green color indicates that the asset is “Approved”, gray indicates “In progress” and red indicates “Rejected”. Below you can see an example of how the status dropdown indicate that the asset status goes from “No status” to “Approved”:
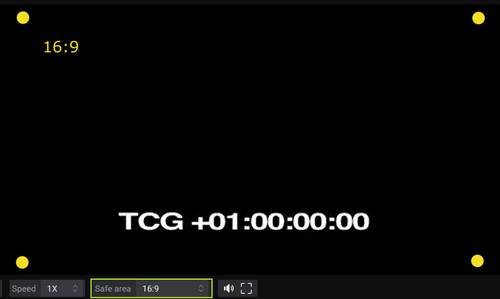
If there are safe areas available they can be activated by selecting them in the toolbar. Note that a safe area will only be available for selection if the aspect ratio for the area matches the aspect ratio of the video. In the image below you can see the safe area as yellow dots in the corners of the video:
The visibility if the safe area select in the toolbar can be toggled on/off in your user preference settings.
It is possible to detach the video player from the main window. This is done by clicking the detach button in the toolbar.
When clicking the detach button the video player is moved to a separate window which can be moved to another screen without loosing any of the player functionality. If the player window loses focus you just click the detach button again and the player window will regain focus.
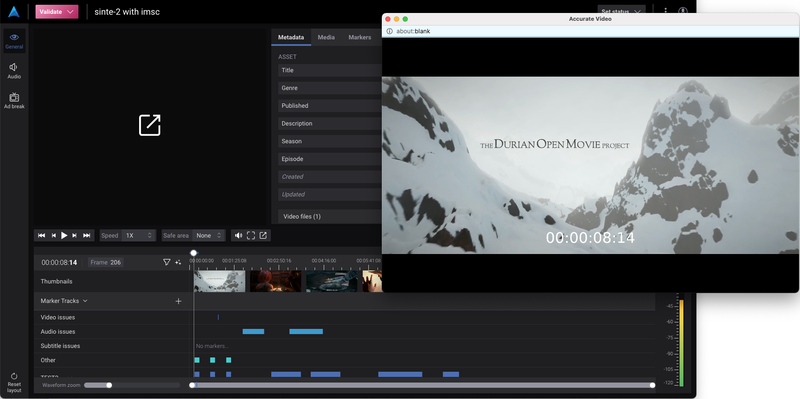
Video asset will automatically load in the separate window if it is left open when navigating between assets. However, the window will close automatically if the page is reloaded. Closing the player window will restore the video player in it's original position in the Accurate Video UI.
For your convenience AV Validate contains hotkeys for almost every visual button and function. There are also additional hotkeys which give the users even more advanced options. When you get to work with the application you will notice that the hotkeys save a lot of time. Also note that all buttons and functions will show their respective hotkeys when you hover over them with the cursor. Here is the full list of hotkeys:
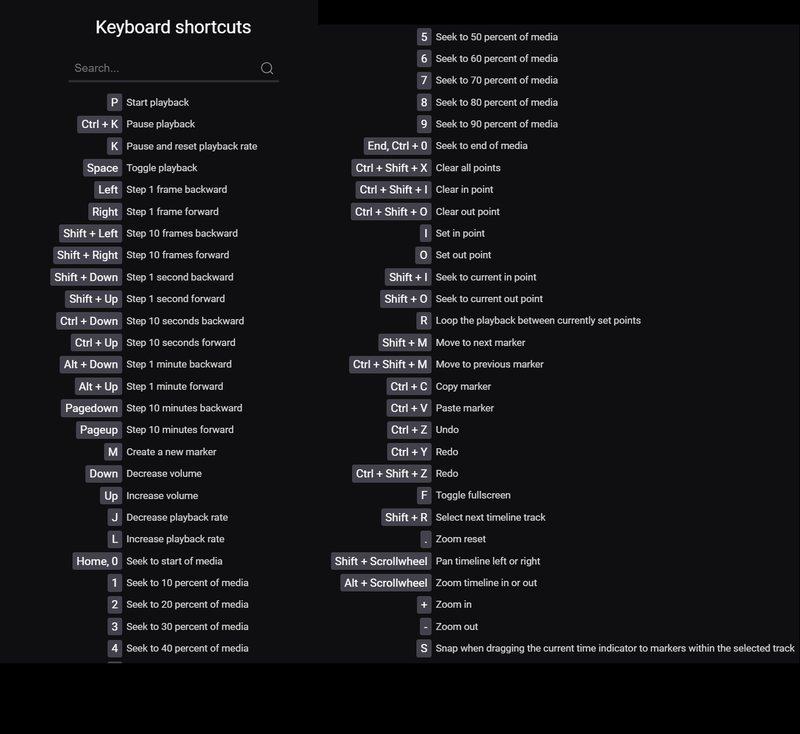
Note that there may be different/added hotkeys based on what version you are using