

In this article we explore how to encode content to be compatible with MPEG-DASH streaming, which can be played by any DASH-compliant player, such as the Accurate Player. We’ll demonstrate how to encode and package multi-bitrate videos in different quality renditions to support users with different bandwidth. Multiple audio tracks are included as well, illustrating how to deal with language tracks in different languages or dubbed audio. Finally, multiple subtitles are added as well, in different languages.
We’ll only use the free & open-source tools ffmpeg and gpac to transcode video and audio and package them into a playlist and segments conformant to the MPEG-DASH specification. In the end, we’ll investigate how we can quickly upload our encoded content into an AWS S3 bucket for delivery to Accurate Player. No streaming server is required.
FFmpeg is the world’s most used multimedia framework for encoding, decoding, transcoding, muxing, demuxing, filtering, and playing any kind of media files. It’s completely free and open-source.
Installation of FFmpeg is very easy but depends on what operating system you are using. Refer to the documentation available online or on the FFmpeg homepage for more instructions.
FFmpeg documentation: https://ffmpeg.org/
GPAC is another open-source multimedia framework, in this guide we’ll make use of their excellent multimedia packager as a complement to FFmpeg, to bundle files in DASH compliant packages.
GPAC documentation: https://gpac.wp.imt.fr/
We’ll use AWS S3 to store the finished DASH files for delivery to the player. Using the AWS CLI, we’ll copy all transcoded files directly from our local computer to the cloud. When we’re done, we can just delete the bucket to clean up.
We’ll use Accurate Player, a broadcast-quality HTML5 player framework, for frame-accurate playback of our manifest files, which has full DASH support and is easy to get started with. Look at the end of the guide if you’re interested in trying out yourself.
The first step is figuring out how many DASH renditions to include, and at what quality. The advantage of DASH is that it will automatically detect the best quality based on your available bandwidth, but you can absolutely use a single rendition as well. One big advantage of DASH over progressive is support for DRM.
Let’s look at an example bit-rate ladder:
Bitrate (kbps) - Resolution
235 - 320x240
375 - 384x288
560 - 512x384
750 - 512x384
1050 - 640x480
1750 - 720x480
2350 - 1280x720
3000 - 1280x720
4300 - 1920x1080
5800 - 1920x1080
Let’s include three different renditions. One low rendition at 240p, one middle at 480p and a high at 1080p.
For input, we’ll use everyone’s favorite, the free Sintel movie. We’ll use the HD 1080p version available in the download section. Download here. Let’s begin by inspecting it using ffprobe, another free tool which is part of the FFmpeg package.
ffprobe --hide_banner Sintel.2010.1080p.mkv
Input #0, matroska,webm, from 'Sintel.2010.1080p.mkv':
 Metadata:
 encoder : libebml v1.0.0 + libmatroska v1.0.0
 creation_time : 2011-04-25T12:57:46.000000Z
 Duration: 00:14:48.03, start: 0.000000, bitrate: 10562 kb/s
 Stream #0:0(eng): Video: h264 (High), yuv420p(tv, bt709/unknown/unknown, progressive), 1920x818, SAR 1:1 DAR 960:409, 24 fps, 24 tbr, 1k tbn, 48 tbc
 Stream #0:1(eng): Audio: ac3, 48000 Hz, 5.1(side), fltp, 640 kb/s
Some details omitted above, but you can see the interesting parts in the streams - namely the audio and video stream.
Our desired video format is H.264/AVC inside segmented mp4 containers, with AAC audio in stereo. Let’s start by using ffmpeg to demux and re-encode the video into the intermediate files that we’ll use for our DASH renditions. In this step we ignore audio, since it will be encoded separately. This encode step will take a while, use -preset ultrafast for quicker encode.
# 4300k 1080p
ffmpeg -y -i Sintel.2010.1080p.mkv -c:v libx264 \
 -r 24 -x264opts 'keyint=48:min-keyint=48:no-scenecut' \
 -vf scale=-2:1080 -b:v 4300k -maxrate 4300k \
 -movflags faststart -bufsize 8600k \
 -profile:v main -preset fast -an "video_intermed_4300k.mp4"
Let’s look at the parameters used above before doing the other renditions:
-c:v libx264
Use the libx264 video encoder.
-r 24
Set frame rate, 24 is the same as the original file.
-x264opts 'keyint=48:min-keyint=48:no-scenecut'
Pass some specific options to the encoder.
Defines the maximum & minimum interval between keyframes (GOP). This setting is closely related to the segment length (explained later), as the video will be split into segments and a keyframe should exist at the beginning of each segment. In this example, the original video is encoded at 24 FPS with a segment length of 4 seconds. It’s very important that every segment starts with a keyframe. Here we’ll include 2 closed GOPs in each segment.
The encoder has an adaptive keyframe decision mechanism, which will per default insert keyframes when it detects a scene change. Since we want a fixed keyframe structure, we disable this setting with the no-scenecut parameter.
-vf scale=-2:1080
Use the scale video filter to resize the video.
-b:v 4300k
Specifies the target (average) bit rate for the encoder to use.
-maxrate 4300k, -bufsize 8600k
Use constrained encoding using the Video Buffering Verifier. A good starting point is to set maxrate to the same as bitrate, bufsize twice the maxrate. Check the ffmpeg documentation for more details.
-movflags faststart
Set the moov atom at the front of the file (Fast Start). This is an important setting for optimal playback in web-based players.
-preset fast
Select what encoder preset to use. Slower encoding means more compression & smaller file sizes but longer encoding time. Set to ultrafast if you want a quick transcode for testing. See comparison here.
-profile:v main
Uses the H.264 main profile, which is the most universally supported across different devices and operating systems, while offering good transcoding quality and options. Read about profiles here.
-an
Skip audio. We’re doing video and audio separately to ensure our adaptation sets are not multiplexed. See later section for audio encoding.
Now we can do the other renditions as well:
# 1050k 480p
ffmpeg -y -i Sintel.2010.1080p.mkv -c:v libx264 \
 -r 24 -x264opts 'keyint=48:min-keyint=48:no-scenecut' \
 -vf scale=-2:480 -b:v 1050k -maxrate 1050k \
 -movflags faststart -bufsize 8600k \
 -profile:v main -preset fast -an "video_intermed_1050k.mp4"
# 235k 320p
ffmpeg -y -i Sintel.2010.1080p.mkv -c:v libx264 \
 -r 24 -x264opts 'keyint=48:min-keyint=48:no-scenecut' \
 -vf scale=-2:320 -b:v 235k -maxrate 235k \
 -movflags faststart -bufsize 8600k \
 -profile:v main -preset fast -an "video_intermed_235k.mp4"
Now we have three intermediate video files, at different quality. We can see the dramatic difference in file size between them, and if you play them you can also see the difference in quality with very blocky and low resolution for the lower files:
-rw-rw-r-- 1 ubuntu ubuntu 1.1G Apr 25 2011 Sintel.2010.1080p.mkv
-rw-rw-r-- 1 ubuntu ubuntu 107M Aug 24 12:59 video_intermed_1050k.mp4
-rw-rw-r-- 1 ubuntu ubuntu 26M Aug 24 13:11 video_intermed_235k.mp4
-rw-rw-r-- 1 ubuntu ubuntu 432M Aug 24 12:50 video_intermed_4300k.mp4
Note that the frame rate of the encoded video files will be the same as the input, which in this case is 24. You’ll need to change the GOP setting above to adjust for other frame rates. We want to ensure every DASH segment begins with a keyframe.
The next step is to encode the audio, if there is any. If not, you can simply skip this step.
Here we have different options. If the original file contains multiple audio tracks, we can extract them for use in our DASH file. We can also encode audio from other, discrete audio files, for example, a dubbed voiceover track. The Sintel movie doesn’t have more than one audio track, but if there is you’ll see ffprobe output like the following:
ffprobe input.mxf
Stream #0:1(eng): Audio: aac (LC) (mp4a / 0x6134706D), 48000 Hz, stereo, fltp, 128 kb/s (default)
Stream #0:2(eng): Audio: aac (LC) (mp4a / 0x6134706D), 48000 Hz, stereo, fltp, 128 kb/s (default)
Stream #0:3(eng): Audio: aac (LC) (mp4a / 0x6134706D), 48000 Hz, stereo, fltp, 128 kb/s (default)
Stream #0:4(eng): Audio: aac (LC) (mp4a / 0x6134706D), 48000 Hz, stereo, fltp, 128 kb/s (default)
Here there are 4 different audio tracks/streams. Use the 0:x id to select what track to use. Extract and re-encode audio from the original Sintel file using the following command:
ffmpeg -y -i Sintel.2010.1080p.mkv -map 0:1 -vn -c:a aac -b:a 128k -ar 48000 -ac 2 audio1.m4a
Let’s look at the ffmpeg parameters for audio:
-map 0:x
Map the audio track of the original file. Replace x depending on the number of the stream for the audio track.
-vn
Skip inclusion of video. Only encoding audio here.
-c:a aac
Use the native FFmpeg AAC encoder for audio. This is the second-highest quality encoder available, and the default one. Fraunhofer has a better one, but it comes with certain cons. More details here.
-b:a 128k
Set audio bitrate to 128k.
-ar 48000
Set the sample rate to 48 kHz.
-ac 2
Downmix the audio from 5.1 to stereo.
If we look at the Sintel page, there is a discrete flac audio file without voices, for dubbing. Let’s include that audio track as well. Download here.
ffmpeg -y -i sintel-m+e-st.flac -map 0:0 -vn -c:a aac -b:a 128k -ar 48000 -ac 2 audio2.m4a
Before we move on to DASH packaging, let’s include some subtitles as well. On the Sintel download page, SRT subtitles exist in many different languages. Let’s grab a few:
wget https://durian.blender.org/wp-content/content/subtitles/sintel_en.srt
wget https://durian.blender.org/wp-content/content/subtitles/sintel_es.srt
wget https://durian.blender.org/wp-content/content/subtitles/sintel_de.srt
We’ll need to convert them from SRT to VTT (WebVTT). Easy to do using FFmpeg:
ffmpeg -i sintel_en.srt sintel_en.vtt
ffmpeg -i sintel_es.srt sintel_es.vtt
ffmpeg -i sintel_de.srt sintel_de.vtt
We also need to add them to MP4 containers, and set the language metadata field. We can use the gpac MP4Box packager for this:
MP4Box -add sintel_en.vtt:lang=en subtitle_en.mp4
MP4Box -add sintel_es.vtt:lang=es subtitle_es.mp4
MP4Box -add sintel_de.vtt:lang=de subtitle_de.mp4
You should by now have a number of files, both video, audio, and subtitles. It’s time to package them together to form the DASH master manifest and create segments. Here we’ll use the gpac MP4Box packager again.
Let’s look at the command to generate everything:
MP4Box -dash 4000 -frag 4000 -rap \
-segment-name 'segment_$RepresentationID$_' -fps 24 \
video_intermed_235k.mp4#video:id=240p \
video_intermed_1050k.mp4#video:id=480p \
video_intermed_4300k.mp4#video:id=1080p \
audio1.m4a#audio:id=English:role=main \
audio2.m4a#audio:id=Dubbed:role=dub \
subtitle_en.mp4:role=subtitle \
subtitle_es.mp4:role=subtitle \
subtitle_de.mp4:role=subtitle \
-out dash/playlist.mpd
It’s a long one, but let’s break it down:
-dash 4000
Create DASH segments of 4 seconds. This is a good starting point, but you can have different segment sizes, depending on the delivery and content. Somewhere around 2-4 seconds is suitable. You can find a lot of articles covering this in detail online.
-frag 4000
Only use one subsegment per segment. More details here.
-rap
Ensures that segments to start with random access points (keyframes). Segment duration may differ depending on where keyframes are, thus we encoded the video with specific keyframes before.
-segment-name 'segment_$RepresentationID$_'
Just makes the names of segments a bit easier to read. Example: segment_240p_x.m4s where x is an incrementing value.
-fps 24
Sets the FPS, same as before.
video_intermed_235k.mp4#video:id=240p
The lowest quality rendition. The id attribute can be used to give it a name that the user will see in the drop-down of their player. The #video selection here is optional since this file only contains video and no audio. However, if using files that contain both, this will ensure we only use the video track. You'll otherwise end up with multiplexed adaptation sets (multiple audio and video in the same segment), which many web-based DASH players don't support.
video_intermed_1050k.mp4#video:id=480p
Middle rendition at 480p.
video_intermed_4300k.mp4#video:id=1080p
High rendition at 1080p.
audio1.m4a#audio:id=English:role=main
The first audio track. Give it an id to easier distinguish it, the metadata field role can be set to main for the primary audio track.
audio2.m4a#audio:id=Dubbed:role=dub
The second audio track, without voices. Set role metadata to dub for additional audio tracks.
subtitle_en.mp4:role=subtitle
English subtitles.
subtitle_es.mp4:role=subtitle
Spanish subtitles.
subtitle_de.mp4:role=subtitle
German subtitles.
-out dash/playlist.mpd
The output name of the DASH master manifest. Recommended is to create a new empty directory (here dash), or you’ll end up with lots and lots of files in the current directory.
A quick fix before we are done. Replace the mime type of subtitles from “video/mp4” to “application/mp4”, this will ensure universal support for playback (specifically Shaka player).
cd dash
sed -i 's/mimeType=\"video\/mp4\" codecs=\"wvtt\"/mimeType=\"application\/mp4\" codecs=\"wvtt\"/g' playlist.mpd
That’s it! We are done with encoding & packaging. Everything is ready for delivery to a player. You should see many different m4s segment files and a manifest inside the dash subfolder.
As mentioned in the start, no additional streaming server is required. However, we do need a standard web server to serve the static DASH files, since we want to use a web-based player in this case. We can either use a standard web server such as the popular nginx, or IIS, Apache or any other server.
We can also use the cloud and not have to bother getting a server up and running. Let’s explore how to use an AWS S3 bucket to store and host the files.
The first step is creating a bucket, then copying the files to it, and finally setting some CORS settings on the bucket (due to JavaScript limitations). We’ll be using the AWS CLI here, but you can also use the UI if you want.
For simplicity in this guide, all files will be served publically inside the bucket (anyone with the link can access them). For a production system, you’d want to protect the bucket with credentials.
aws s3api create-bucket --acl public-read --bucket ap-dash-test \
 --region eu-west-1 \
 --create-bucket-configuration LocationConstraint=eu-west-1
Refer to the create bucket documentation for details. Note that we enable public read access from this bucket. You’ll get a response back with the relative URL of your newly created bucket:
{
 "Location": "http://ap-dash-test.s3.amazonaws.com/"
}
Let’s copy everything from the dash directory to the root of the bucket.
cd dash
aws s3 cp . s3://ap-dash-test/ --recursive --acl public-read
Simply append the playlist.mpd to the above link to create the full URL you feed to a player to play this DASH content (you can use https instead too).
As the last step we’ll need to enable CORS headers on this bucket. Copy the following into a file called cors.json:
{
 "CORSRules": [
 {
 "AllowedOrigins": ["*"],
 "AllowedHeaders": ["*"],
 "AllowedMethods": ["GET", "HEAD"],
 "MaxAgeSeconds": 3000,
 "ExposeHeaders": ["x-amz-server-side-encryption", "Content-Range"]
 }
]
}
Then run the following command to set the CORS policy on the bucket:
aws s3api put-bucket-cors --bucket ap-dash-test --cors-configuration file://cors.json
That’s it. All files are now located inside the bucket, ready for delivery to a player.
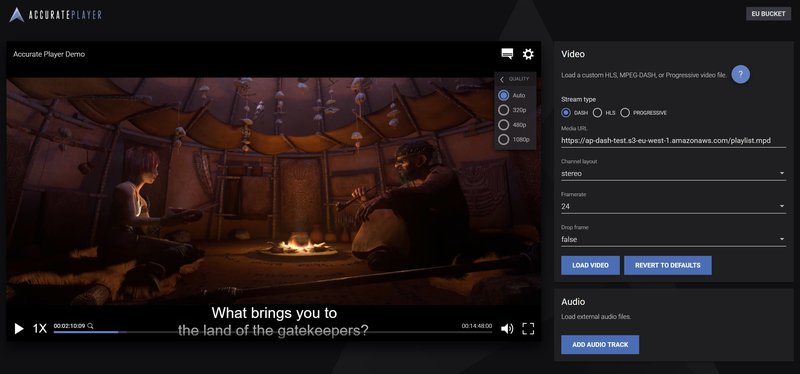
We can now fire up Accurate Player to take a look at this DASH manifest and see everything coming together. We use the “Test your Content” demo of Accurate Player where we can play DASH, HLS, or progressive files by simply pasting a URL.
Select DASH, and paste the full URL to the playlist created, and hit Load video.
The player will load and start playing. If we explore the options in the cogwheel, we can see the three different renditions available (default is on auto). The icon to the left shows the two available audio tracks, as well as the three different subtitle languages.
Codemill is a digital product and service studio, offering both products Accurate Player & Accurate Video, and professional services for complex video workflows and cloud solutions.
Accurate Player is an HTML5 frame-accurate player designed for broadcast, post-production, and media professionals. Designed for seamless integration with your video platform, application, or MAM. It supports playing your content with frame accuracy natively in HTML5, without any browser plugins.
Accurate Video is a web-based video platform, powered by Accurate Player, supporting complex workflows as Visual QC, Audio QC, Promo Creation, Subtitle Editing, and Poster creation.
Contact us if you’re interested in learning more.
Codemill - https://codemill.se/
Accurate Player - https://accurateplayer.com/
Accurate Video - http://accurate.video/
Author
Jonas Sandberg, Senior Solution Architect, Codemill
jonas.sandberg@codemill.se